CENG 589 Cloth Simulation Project
Introduction
At the end of the semester, thanks to this course, I had time to learn how to implement simple cloth simulations. I have adapted the ideas that are presented in the following links:
- ArturoNereu Cloth Sim
- Mosegaards Cloth Simulation Tutorial
- Biebras - Simple Cloth Simulation
- Ubisoft Cloth Simulation
The source code is here
The demo video is here:
Implementation
So, I already had a base application for representing meshes and navigating the scene. So, I had to find a way to properly initialize a cloth mesh and then create a particle system that would represent the vertices of the mesh. I also had to find a way to compute the normals. I understood that indices would not change during the simulation so initializing the index buffer once would be sufficient. I just had to update the vertex buffer each timestep.
For that, I first made a quick update on how I created vertex buffers. Since I have to update the buffer each time step, I have to create the vertex buffer using GL DYNAMIC DRAW flag. So, the function I used for this purpose became like this:
OpenGLVertexBuffer::OpenGLVertexBuffer(void* vertices, uint32_t size)
{
    glCreateBuffers(1, &m_RendererID);
    glBindBuffer(GL_ARRAY_BUFFER, m_RendererID);
    glBufferData(GL_ARRAY_BUFFER, size, nullptr, GL_DYNAMIC_DRAW);
}
As it is seen in the code above, I pass nullptr to the data because I will update it later. GL DYNAMIC DRAW flag helps OpenGL to use this buffer more wisely in terms of memory management because we are saying that we will update this buffer a lot.
Cloth Class
Cloth is a mesh but I wanted it to be separated from the actual mesh class. Inside this class, I hold (first two ones are taken from (Mosegaards Cloth Simulation Tutorial)):
- Cloth Particles: Each vertex is a cloth particle that has some physical properties. It also has a position and an acceleration. Applying forces on them changes the acceleration. Each time step, their positions are updated using verlet integration. ClothParticle struct looks like the following:
struct ClothParticle
{
    bool moving;
    uint32_t id;
    float mass;
    glm::vec3 acceleration;
    glm::vec3 pos;
    glm::vec3 oldPos;
    glm::vec3 normal;

    void addForce(glm::vec3 f) { acceleration += f / mass; }

    void step()
    {
        if (moving)
        {
            glm::vec3 temp = pos;
            pos = pos + (pos - oldPos) * (float)(1.0 - DAMPING) + acceleration * (float)(TIMESTEP);
            oldPos = temp;
            acceleration = glm::vec3(0.0f, 0.0f, 0.0f);
        }
    }

    void resetAcceleration() { acceleration = glm::vec3(0.0f, 0.0f, 0.0f); }
    void offsetPosition(glm::vec3 offset) { if (moving) pos += offset; }
    void disableMoving() { moving = false; }

    void addNormal(glm::vec3 n) { normal += glm::normalize(n); }
    void resetNormal() { normal = glm::vec3(0.0f, 0.0f, 0.0f); }

};
- Cloth Constraint: Each Particle is connected to its neighboring particles in the mesh. But here, I consider squares instead of triangles. Each time step, we also need to check the distance between two particles that are part of a constraint. If they are way to close to each other, we have to separate them and if they are too far away, we need to get them closer. Cloth Constraint struct looks like the following:
struct ClothConstraint
{
    float restDistance;
    ClothParticle* particle1;
    ClothParticle* particle2;

    ClothConstraint(ClothParticle* p1, ClothParticle* p2)
    {
        particle1 = p1;
        particle2 = p2;
        restDistance = glm::length(p1->pos - p2->pos);
    }

    void apply()
    {
        glm::vec3 p1p2 = particle2->pos - particle1->pos;
        float dist = glm::length(p1p2);
        glm::vec3 correction = p1p2 * (1 - restDistance / dist);
        glm::vec3 correctionHalf = correction / 2.0f;
        particle1->offsetPosition(correctionHalf);
        particle2->offsetPosition(-correctionHalf);
    }
};
- ClothVertex: I also hold a ClothVertex struct for the vertex buffer. It looks like:
	struct ClothVertex
	{
		glm::vec3 Pos;
		glm::vec3 Normal;
		glm::vec2 TexCoord;
	};
Cloth Class Constructor
When a cloth is created, we have two arguments:
- Size
- Divisor
The size gives the length of one edge. Cloth is always square shaped. Divisor is simply how many squares we want in each row or column. Constructor does this:
Cloth::Cloth(uint32_t size, uint32_t divisor)
{
    m_RenderSpecs.albedo = glm::vec3(0.7, 0.6, 0.76);
    InitializeArrayBuffer(size, divisor);
    SetupMesh();
}
Secondly, we initialize the array buffer. We pass size and divisor to the InitializeArrayBuffer function. This calculates vertex positions and forms the triangles that we need. Indices and triangles look like the following figure. The mesh is defined in xy plane:
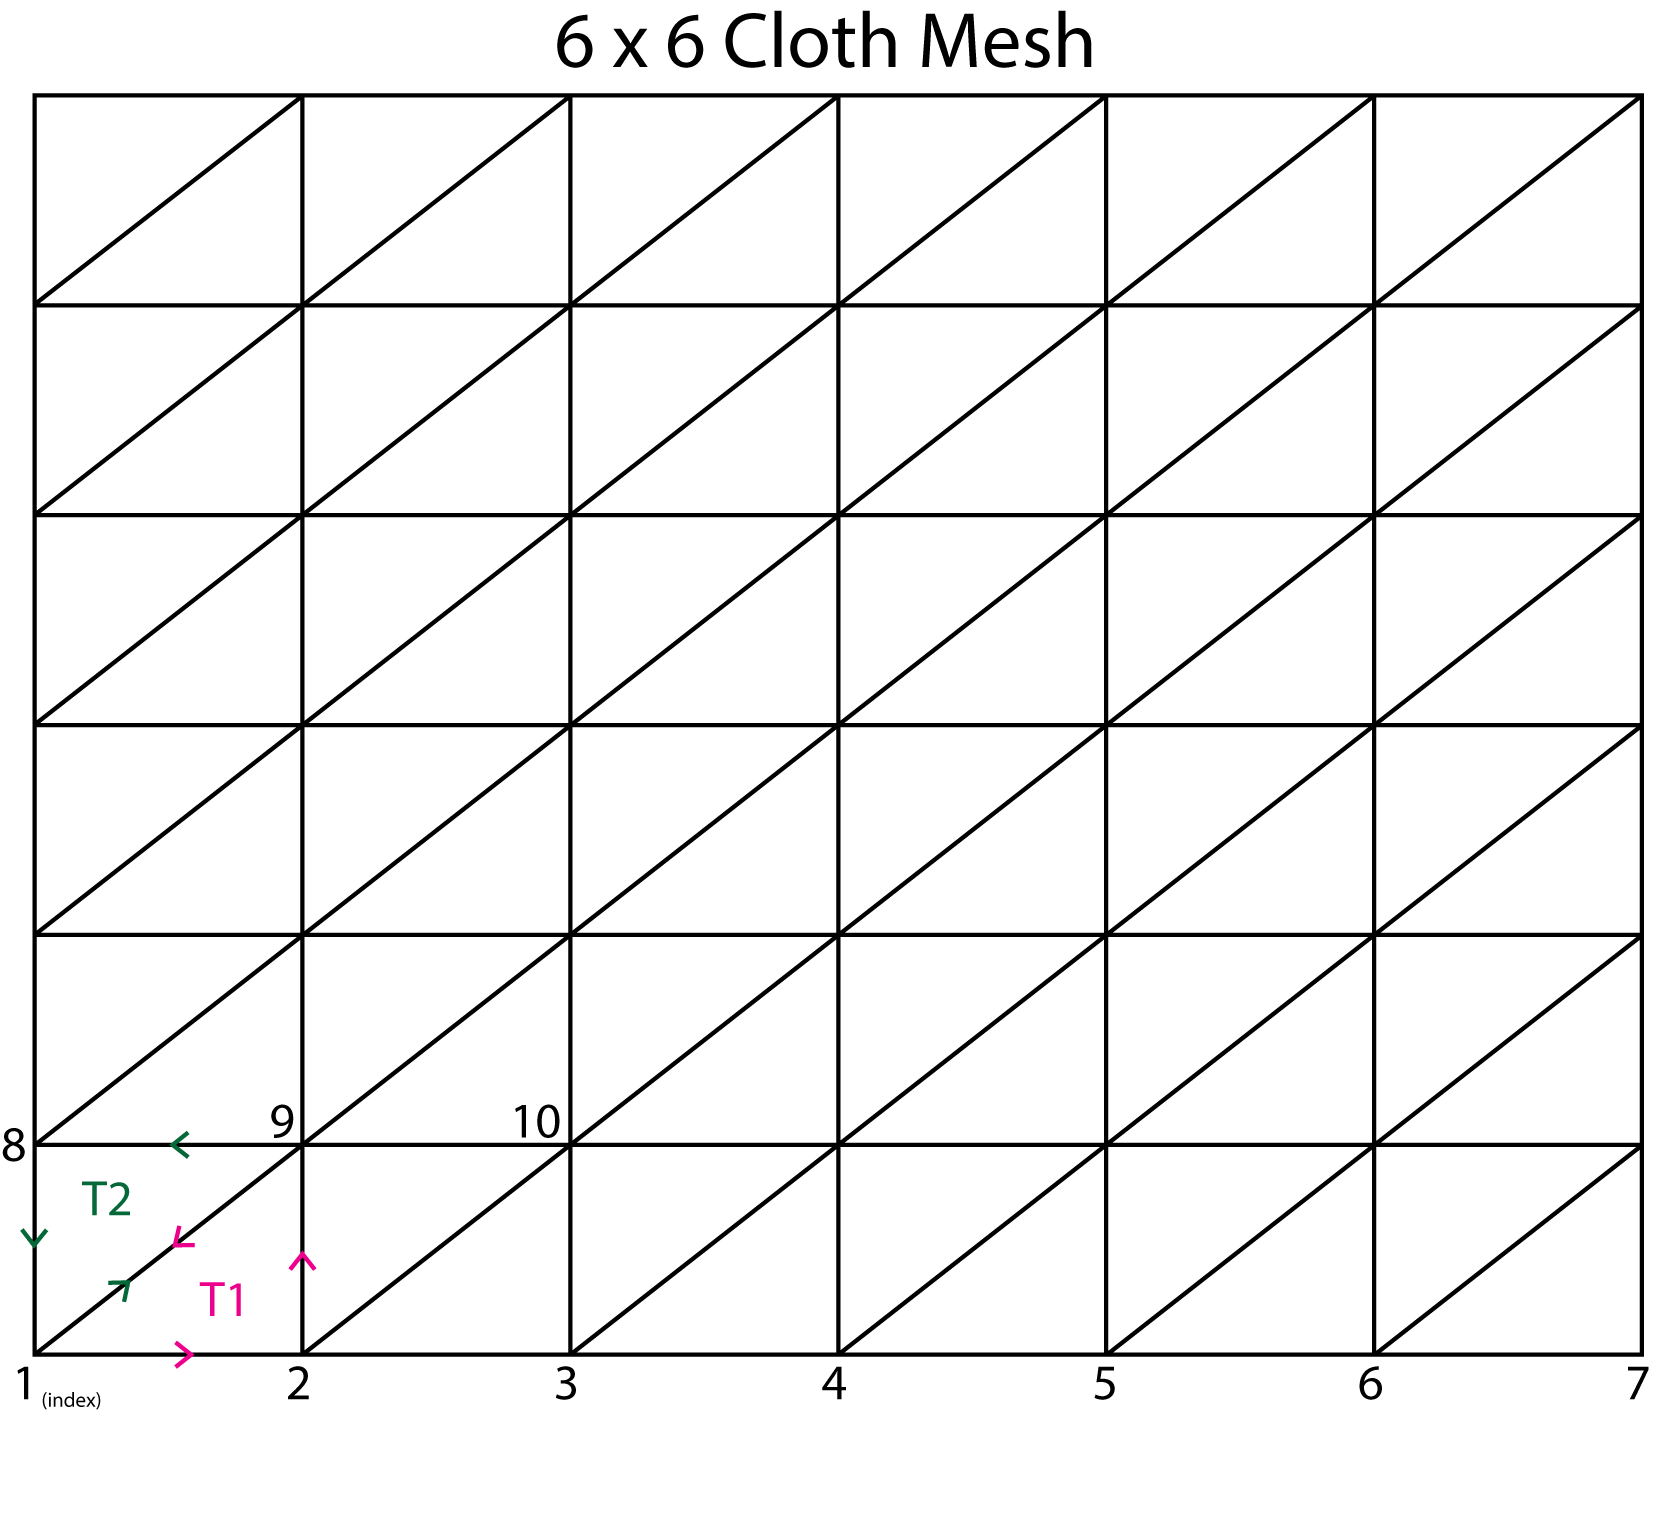
Cloth Grid
InitializeArrayBuffer function implements the idea given above. It looks like the following:
void Cloth::InitializeArrayBuffer(uint32_t size, uint32_t divisor)
{
    m_ArrayBuffer.clear();

    double step = (double)size / (double)divisor;

    double halfSize = (double)size / 2.0;

    int i = 0;
    int j = 0;

    int id = 0;
    // Cloth will be initialized at xy plane so
    // z coords will always be 0
    for (double y = -halfSize, i=0; i <= divisor; y += step, i++)
    {
        for (double x = -halfSize, j=0; j <= divisor; x += step, j++)
        {
            ClothVertex v;
            v.Pos = glm::vec3(x, y, 0.0f);
            v.Normal = glm::vec3(0.0f, 0.0f, 1.0f);
            v.TexCoord = glm::vec2((x + halfSize) / size, (y + halfSize) / size);
            m_ArrayBuffer.push_back(v);

            ClothParticle p;
            p.acceleration = glm::vec3(0.0f, 0.0f, 0.0f);
            p.mass = 1.0f;
            p.id = id;
            p.moving = (i==divisor) ? false : true;
            p.pos = glm::vec3(x, y, 0.0f);
            p.oldPos = glm::vec3(x, y, 0.0f);
            p.normal = glm::vec3(0.0f, 0.0f, 1.0f);

            m_ClothParticles.push_back(p);
            id++;
        }
    }

    // The size of particles is (divisor + 1) * (divisor + 1)
    for (int i = 0; i < divisor; i++)
    {
        for (int j = 0; j < divisor; j++)
        {
            // 1st triangle
            //        3
            //      / |
            //     /  |
            //   1 -- 2
            m_Indices.push_back(i * (divisor + 1) + j);
            m_Indices.push_back(i * (divisor + 1) + j + 1);
            m_Indices.push_back((i + 1) * (divisor + 1) + j + 1);

            // 2nd triangle
            //  3 -- 2
            //  |  /
            //  | /
            //  1
            m_Indices.push_back(i * (divisor + 1) + j);
            m_Indices.push_back((i + 1) * (divisor + 1) + j + 1);
            m_Indices.push_back((i + 1) * (divisor + 1) + j);

            // Constraints
            //  2 --- 3
            //  |     |
            //  |     |
            //  1 --- 4
            int index1 = i * (divisor + 1) + j;
            int index2 = (i + 1) * (divisor + 1) + j;
            int index3 = (i + 1) * (divisor + 1) + j + 1;
            int index4 = i * (divisor + 1) + j + 1;

            ClothParticle* p1 = &m_ClothParticles[index1];
            ClothParticle* p2 = &m_ClothParticles[index2];
            ClothParticle* p3 = &m_ClothParticles[index3];
            ClothParticle* p4 = &m_ClothParticles[index4];

            m_Constraints.push_back(ClothConstraint(p1, p2));
            m_Constraints.push_back(ClothConstraint(p1, p4));
            m_Constraints.push_back(ClothConstraint(p2, p3));
            m_Constraints.push_back(ClothConstraint(p3, p4));

        }
    }
}
We have also added constraints while forming the triangles. The good part is that in the m_Indices each consequent three element is a triangle in the mesh so we can easily access them. It will be important while recalculating the normals. After this, we have to create our vertex buffer and vertex array object. We do it like this:
void Cloth::SetupMesh()
{
    m_VertexArray = VertexArray::Create();

    m_VertexBuffer = VertexBuffer::CreateDynamic(m_ArrayBuffer.size() * sizeof(ClothVertex));
    m_VertexBuffer->SetData(&m_ArrayBuffer[0], m_ArrayBuffer.size() * sizeof(ClothVertex));
    m_VertexBuffer->SetLayout(
        {
            { ShaderDataType::Float3, "a_Position" },
            { ShaderDataType::Float3, "a_Normal"   },
            { ShaderDataType::Float2, "a_TexCoord" }
        }
    );

    m_VertexArray->AddVertexBuffer(m_VertexBuffer);
    m_IndexBuffer = IndexBuffer::Create(&m_Indices[0], m_Indices.size());
    m_VertexArray->SetIndexBuffer(m_IndexBuffer);
}
The set layout and add vertex buffer functions are very elegant abstractions of binding a vertex buffer to a vertex array object with glEnableVertexAttribArray and glVertexAttribPointer. This way, a cloth mesh is created. We only have to simulate it and update this vertex buffer now.
Simulation
The cloth is affected by:
- Gravity: Earth's gravity (9.8m/s)
- Wind: Cloth is affected by a wind that goes -z direction.
- Sphere Collision: Each timestep, the collision between each vertex and a sphere is tested.
Applying gravity is easy, we just add a force like this to each particle:
This force is in y direction.
Applying wind is a little bit different, we have to apply the force in proportion to triangles' normals. It is done like the following:
void Cloth::ApplyWind(const glm::vec3& direction)
{
    for (int i = 0; i < m_Indices.size(); i += 3)
    {
        ClothParticle* p1 = &m_ClothParticles[m_Indices[i]];
        ClothParticle* p2 = &m_ClothParticles[m_Indices[i + 1]];
        ClothParticle* p3 = &m_ClothParticles[m_Indices[i + 2]];

		glm::vec3 normal = ComputeFaceNormal(p1->pos, p2->pos, p3->pos);
		glm::vec3 normalDir = glm::normalize(normal);
		glm::vec3 force = normal * (glm::dot(normalDir, direction));
		p1->addForce(force);
		p2->addForce(force);
		p3->addForce(force);
    }
}
So, the only two things left for stepping the simulation is updating the normals and vertex buffer. Normals are updated as the following:
void Cloth::UpdateNormals()
{
    for (auto& particle : m_ClothParticles)
    {
        particle.resetNormal();
    }

    for (int i = 0; i < m_Indices.size(); i += 3)
    {
        ClothParticle* p1 = &m_ClothParticles[m_Indices[i]];
        ClothParticle* p2 = &m_ClothParticles[m_Indices[i + 1]];
        ClothParticle* p3 = &m_ClothParticles[m_Indices[i + 2]];

        glm::vec3 norm = ComputeFaceNormal(p1->pos, p2->pos, p3->pos);

        p1->addNormal(norm);
        p2->addNormal(norm);
        p3->addNormal(norm);
    }

    for (auto& particle : m_ClothParticles)
    {
        particle.normal = glm::normalize(particle.normal);
    }
}
I add each triangle's normal to its vertices and at the end, I normalize the normals. It seems to be working. Secondly I need to update the vertex buffer. I do it like this:
void Cloth::UpdateVertexBuffer()
{
    for (int i = 0; i < m_ArrayBuffer.size(); i++)
    {
        m_ArrayBuffer[i].Normal = m_ClothParticles[i].normal;
        m_ArrayBuffer[i].Pos = m_ClothParticles[i].pos;
    }

    m_VertexArray->Bind();
    m_VertexBuffer->SetData(&m_ArrayBuffer[0], m_ArrayBuffer.size() * sizeof(ClothVertex));
}
Now we are ready to step the cloth simulation. The stepping function looks like this:
void Cloth::Step()
{
    ApplyGravity();
    ApplyWind(glm::vec3(0.0f, 0.0f, -1.0f * TIMESTEP));

    for (int i = 0; i < CONSTRAINT_ITERATIONS; i++)
    {
        for (auto& constraint : m_Constraints)
        {
            constraint.apply();
        }
    }

    for (auto& particle : m_ClothParticles)
    {
        particle.step();
    }

    UpdateNormals();
    UpdateVertexBuffer();
}
We also have to check for collisions but we do it outside the step function. The collision check function looks like the following:
void Cloth::SphereCollision(glm::mat4 sphereTransform, float radius)
{
    glm::vec3 translation;
    glm::vec3 rotation;
    glm::vec3 scale;

    Math::DecomposeTransform(sphereTransform, translation, rotation, scale);

    // Scale will always be uniform
    float r = radius * scale.x;

    glm::vec3 center = translation;

    for (auto& particle : m_ClothParticles)
    {
        glm::vec3 v = particle.pos - center;
        float dist = glm::length(v);

        if (dist < r)
        {
            particle.offsetPosition(glm::normalize(v) * (r - dist) * 1.7f);
        }
    }
}
I take the transformation matrix of the sphere which is controlled by the user and apply the collision rules on the vertices affected by it. 1.7 is just a magic number I came up with because sometimes the sphere might pierce through the cloth due to the simulation's precision issues.
Conclusion
This cloth simulation can handle 250x250 meshes in real time easily but it can be improved more using parallel processing because constraint solving is the bottleneck here.